Pages

1/29/2013

Organization in my life!

My family and I just moved over our Christmas break and it has given me the opportunity to put some organization into my life!  The best thing that I did with this move, is I got rid of a lot of stuff.  I love these quotes!

"Bottom line is, if you do not use it or need it, 
it's clutter, and it needs to go."
Charisse Ward 


"The more you have, the more you are occupied. 
The less you have, the more free you are." 
Mother Teresa 

Every single thing in my house now has a home!  I had a few items like internet cords, old cell phone chargers, dead batteries, etc. that have been passed from drawer to drawer.  They hadn't been used in years, so now they are gone!  It feels good.

I don't know about you but the #1 clutter maker in our home is paper, you know newspaper, ads, junk mail, bills.  We no longer get the newspaper so that has helped a ton.  Also I have made it my own personal rule to organize the papers as they come in.  No more paper piles for me! ; ) Ads and junk mail get recycled as they enter the house and the other mail gets filed or read right away.

Here are a few other ideas that I have recently come up with to help keep things organized at home.

In the kitchen I use a picture stand to hold our I pad   It's works for me because the kids can't get to it.  I love to use it this way when Pandora is playing as background music and when I'm looking at a recipe while I cook.

I use these plastic storage bins everywhere.  There's one under the bathroom sink, some in the closets, one in the laundry room, and this one is used on my husbands desk.

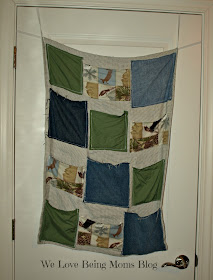
I'm not a seamstress by any means so don't look too close.  This is a pocket organizer that I made with scraps of fabric and stretchy elastic.  It hangs over the office door and holds all of our cords, headphones, and chargers.

I was born and raised in Utah, but am now living in the Midwest while my husband attends medical school.  Needless to say, humidity is a new thing for me!  These containers are awesome to hold a lot of our dry goods.  I like to write the directions from the box right on the container so I never forget.

I love these 5 gallon buckets with lids that you can spin on and off.  Just in case you are wondering, the lids are sold separately.

I love that the 5 gallon buckets hold so much, they are easy to get to and can be stacked if needed, and it frees up counter space because I don't have to use canisters anymore!

A recent Busy Bag Swap is what inspired this next one.  I wanted a way to store all my new busy bags so they would stay organized and actually be used!  I had some extra shower hooks and curtain loops that weren't being used.  If I wasn't going to use them then I was going to get rid of them so this was the perfect solution!
These hang from the closet in our office.  They make it so easy to grab whatever busy bag or crafting project that I need next.

So, I used to be really good at using this spread sheet to plan out my week.  Now....not so much, but I'm going to start using it again soon!  This was good when my baby got older and I was nursing every 4 hours.  It helped me remember when he needed to eat.  Also, on the bottom of the spreadsheet, I have my cleaning schedule and was able to track if I was drinking my 3 water bottles of water each day! ; ) The very bottom line was for anything going on in my husbands day that I needed to be aware of.
In My Meal Plan post a while back I mentioned the dinner options list on my fridge.  I have now added a magnetic sticky pad on the side of the fridge where I can write down any food we run out of and use as a grocery list later on.

If you are new here, we would love for you to Follow us via:
Google + (In our Sidebar)

Photobucket

1/24/2013

12 Brilliant Ideas for Organizing Your Home

Menu Planner
We will be sharing the printables to make this board along with recipes this October so be sure to subscribe or follow our blog.

Coat Closet Organization 
(scarves on hanger, gloves and hats in hanging bin, purses on shower rings, extra bags, jackets and shoes in bin on floor and ready to go diaper bag on top of bin)

Kids Closet

Message Center and Backpack Hooks

Measurement Conversion Chart with Measuring Cups and Spoons 
(Inside of a kitchen cabinet)

Family Calender Printable

Tension Rod Under Kitchen Sink to Hang Spray Bottles

Laundry Room Sorting Station

Hidden Kitchen Organizer

Hidden Cords 

Shoe Organizer in Pantry for All the Little Items
This could be added to any door:
laundry room=cleaners
toy room=toys
study=cords
kids room=kid items
 bathroom=bows

Kids School Papers
Photobucket

1/21/2013

Busy Bag Swap

What is a busy bag?  It's an activity designed to fit in a bag that is toddler friendly and helps to keep little hands and minds busy!

What is a busy bag swap?  It's when you get a group together and each person makes a certain number of the SAME busy bag and then you swap.  This is a great idea to keep costs down, meet new friends, and have some fun!

I recently participated in a busy bag swap!  We had 11 girls that participated, so each girl picked one of the activities listed below that she wanted to be in charge of.  I chose to be in charge of the lacing cards.  I made 11 bags and each bag consisted of 4 different lacing cards.  We set a date that we would exchange the bags and met at a friends house.  Then we brought our bags and traded.  We all left with one of our own bags and 10 other busy bags.

Here is the list of activities that we choose from, but you could choose any activities that you want.  Just make sure to be specific in what you expect!

No sew Fishing Game (make at least 3 fish)


Gel Writing Bag (seal in 2 separate bags to avoid leakage)

Pasta Sort  (use chunky pasta, with multiply colors and shapes)


Magnetic Pom Poms (Include the color printouts)

Lacing Cards (Make 4+ for each bag)


Below are the lacing cards that I made!  I just used card stock and cut it into the shapes below.  If you aren't much of an artist, you can print off a template online and use it as a pattern (that's what I did). : )  Laminate the card stock and cut the excess lamination off leaving about 1/4 of an inch around the edge.  Then just take a hole punch and punch holes around the edge.  I used shoe laces as the thread.  You can buy a whole pack at family dollar for only a dollar! ; )

Sort into piles and place in bags and you are ready to party/swap!

 My boys have loved the busy bags.  We pull ours out during preschool time, before dinner while I cook and sometimes we even take a bag to church with us!


Here a 3 more resources that I found helpful while preparing for our busy bag swap!

Our busy bag swap went really well and was a ton of fun!  If you want to do one go for it!  If you have any questions leave me a comment!  Have fun!

Photobucket

1/15/2013

Mommy and Me Field Trip Group

A friend of mine started up a field trip group with some of her friends and invited us to join her.  We call the group "Mommy and Me Field Trip Group."  We have been able to do a lot of really neat things with our group, my kids and I have enjoyed it so much that I wanted to share the idea here on our blog.

How Big is Your Group?
Our group consists of 7 moms and 12 kids (mostly preschool aged.) 
The group really could be however big or small you want although I would recommend having at least 4 dependable moms to help out.  Don't go to small: We had only 2 kids at one event and felt pretty silly taking time away from a business for such a small group.  I also wouldn't go to big: it's hard to keep a lot of kids under control and coordinate schedules. 

How Often Do You Meet?
We get together once a week or every other week depending on the month. We have found that afternoons work well for most businesses.  We usually meet every Tuesday at 1:00 pm.

How Do You Organize the Field Trips?
We set up the field trip ahead of time so that the business knows we are coming...we tell them we are a local mommy and me field trip group with preschool aged kids and they are usually very happy to have us.  We brainstormed a bunch of places we could visit. One mom is in charge of scheduling the field trip, one mom takes pictures and one mom writes thank you notes.  It has been a great system. 

Where Have You Gone?
We have done a lot of fun things including:

Local Organic Farm- We got to see how chickens, turkeys and cows are raised. We also learned all about vegetable gardens and how food grows. 

Airport- We visited our local airport and learned about flying planes and helicopters. The kids loved sitting in the helicopter and airplane. 

Honey Store- We learned about how honey is made, we saw a bee hive and got to see the bee's making honey, we also got to sample 3 different kinds of honey. We took a jar with us and filled it with honey so we could enjoy it at home. (It cost about $2 to fill the jar below)

Artisan Bread Bakery- We learned the art of baking bread and got to see how bread is mixed, baked, cooled, and cut. We bought a loaf of bread and enjoyed it together. 

 Bus- We all met at a bus stop and rode our city bus to the transit center. We toured the transit center  and then got a personal tour of a bus. The kids got to sit in the drivers seat and push all the buttons.

Logan Fire Department- We toured a fire station and learned about fire safety. The kids loved the firefighter outfits and getting to sit in their truck.

Pizzeria- We toured a local pizzeria and got to see the big oven and walk into the huge Freezer.  The kids got to toss pizza dough and then make their own personal pizza.  (We paid $2.50 a child so they could make their own pizza and get a drink).

Zoo- We made a list of things to watch for and gave one to each child. They had fun looking for certain things like: something that swims, flies, is pink, growls.  

Recycling Center- We talked about recycling and the kids got to see where things go when we recycle.

Post Office- We toured a post office and the kids got to see what happens when we put mail in a mailbox.

Police Department- We toured the police station and got to hear about what a police officer does, we also got to sit in a police car and hear the siren. 

Local Market- We visited a grocery store and learned about how it functions: where all the food comes from and how the shelves are stocked.

Other Field Trip Ideas
Train Station
Animal Center/Pet Shop
Children's Museum
Doctor's/Veterinarian's Center
Farm
Florist/Garden Shop
Hospital
Library
School
Aquarium
Pumpkin Patch
Fish Hatchery
Animal Sanctuary/Nature Area


As I said earlier we have really enjoyed field trip group and look forward to many more fun field trips.  If you are thinking you want to put a group together I would totally recommend it! If you have any questions leave me a comment and I will try to help. 
Photobucket

1/08/2013

Fun Gift Idea for the One You Love

This is a fun gift idea I put together for my husbands birthday.  It could be used for any occasion such as Valentine's Day, Father's Day, an Anniversary gift, or just as an everyday love note.

Here is what the final gift looks like all folded up: (If you use less candy bars it won't be so bulky...this worked fine though, I just sat it on my husbands desk.)

Here is what it looks like once it's all opened up:

What you will need:
Printables (download below)
Envelopes
Glue
Scissors
Candy Bars (or just 3 favorites from the list below)

Candy Bars
100 Grand
Babe Ruth
Butterfinger
Kit Kat
M&M's
Milky Way
3 Musketeer's
Reese's Pieces
Snicker's
Twix

Instructions:
1- Print Candy Bar Printables (simply click on this link)
2- Cut printable into individual tags
3- Glue envelopes together so they look like the picture below. (You will be gluing an envelope top to the bottom of a separate envelope. Keep all of the envelope openings/pockets on the same side.)
4- Glue tags just below envelope opening/pockets.
Here is a closer look:
5- Allow the glue a couple minutes to dry then fold the envelopes together to make sure they fold well. (The top envelope will fold over the last/bottom envelope)
 6- Glue the Birthday Greeting to the front of the envelope. If you are doing this for another occasion simply write your own greeting on the front. (This greeting won't be seen when the envelopes are all opened up only when it's folded up.)
7- Last, stuff each envelope pocket with the candy bar that goes with the tag.
Here is a closer look at each envelope:


We would love for you to Follow us via:
Google + (In our Sidebar)

If you don't love the envelope idea, you could also use these tags as simple tags with individual candy bars.

You can find a whole separate post on using these printables individually here.

You might also like:

Fruit Tag Printables
14 Days of Valentines for the Kids with Printables
14 Days of Valentines for the One You Love with Printables

Photobucket